Session One: How's Your Heart

Drawing: Chalk/Oil Pastel
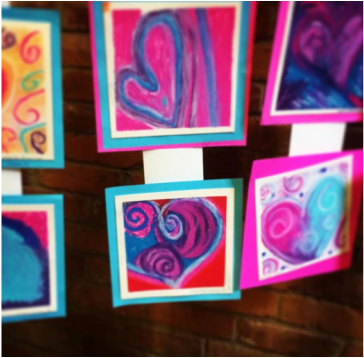
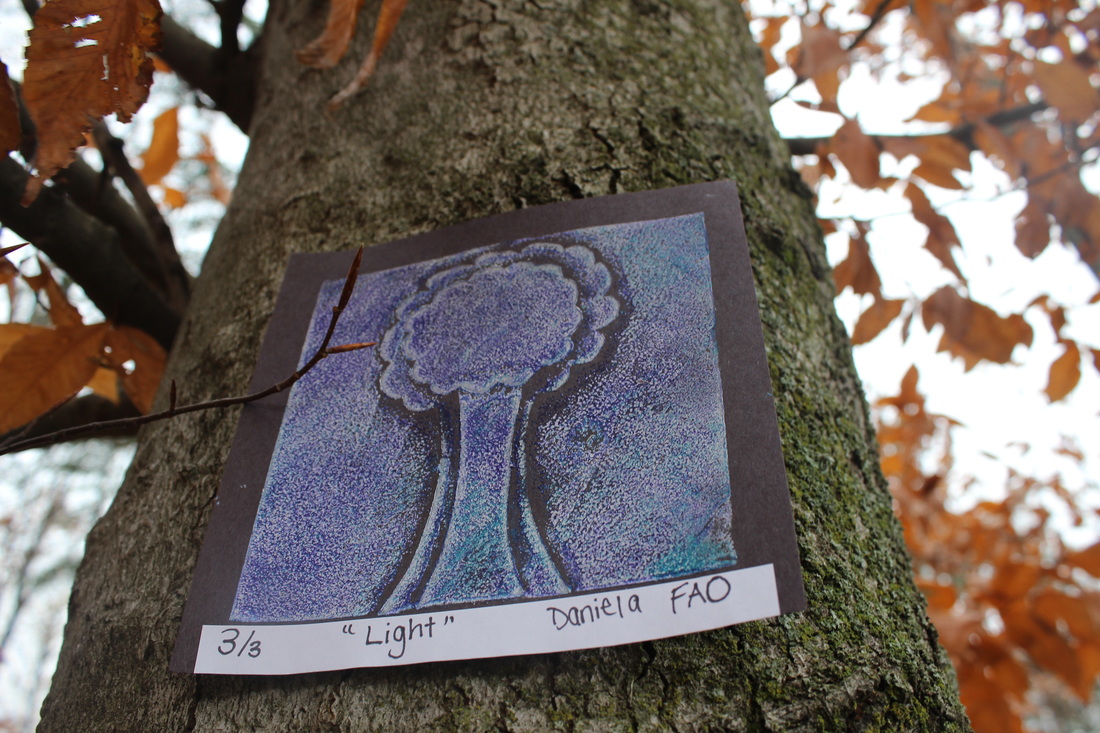
Artists Intent:
When I think of art, I think of my six-year-old niece Isabella. Isabella and I LOVE art, which is why my heart Is so BIG it does not fit the page. The shape of my heart is wide and stretched, which represents my openness and enthusiasm about learning and teaching art. I placed my heart in the centre of the page because art can be used across many other subjects. The four colours I picked to create my heart are close neighbours on the colour wheel and are my personal favourites. My heart is not complete in shape because I am always growing as an artist.
I first started with dark blue (Worry) to design the outline of my heart. The colour blue reminds me of rain. I am worried of rainy days when ideas don’t go as planned or if I have trouble teaching concepts of art. On top of my blue, I have used a white tint to construct a lighter blue because I am optimistic that everything will be all right.
Within all my worries, I have applied whimsical swirls of dark purple (Hopes) and vibrant pink (Joys). Bright pink reminds me of cotton candy. Imagine a child holding cotton candy; is this child filled with joy or what? Joy is peeping through worry in the left corner of my heart because it reminds me to never worry but to find joy within every experience and mistake I face. I chose dark purple to embody hope because when hope seams dark and distant, joy is wrapped all around and makes it bright and smooth.
I associate fire red (Hurt) with blood, pain, and suffering. I painted the colour thick because the hurt I have experienced in the past creates a heavy imprint around my heart. I decided to use red as the background because I am choosing to leave hurt outside of my heart and in the past.


|

|
Session 2&3: What's Your Line

Painting: Colour Quilt
What's Your Line?
- Jagged
- Straight lines (diagonal)
- Wavy
- Broken
- Swirls
What's Your Line?
- Jagged
- Straight lines (diagonal)
- Wavy
- Broken
- Swirls
Session 2&3: Floor Plan
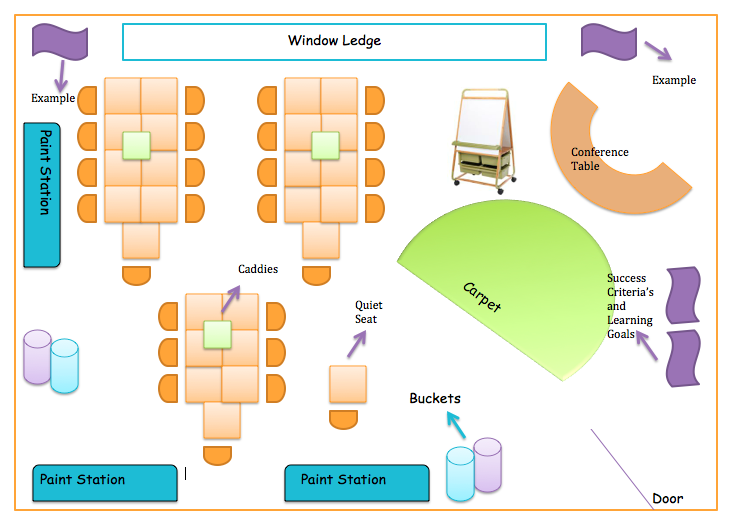
Planning & Organizing: Digital Floor Plan
Revisions:
Since my original version I have added a quiet seat for students who would like to work alone. I have identified the posters around the room indicating that they are success criteria's and learning goals. Caddies were added to the centre of the table so the students have main supplies at their reach and I have also added examples on both sides of the room.
Session 5: Approaching to Drawing


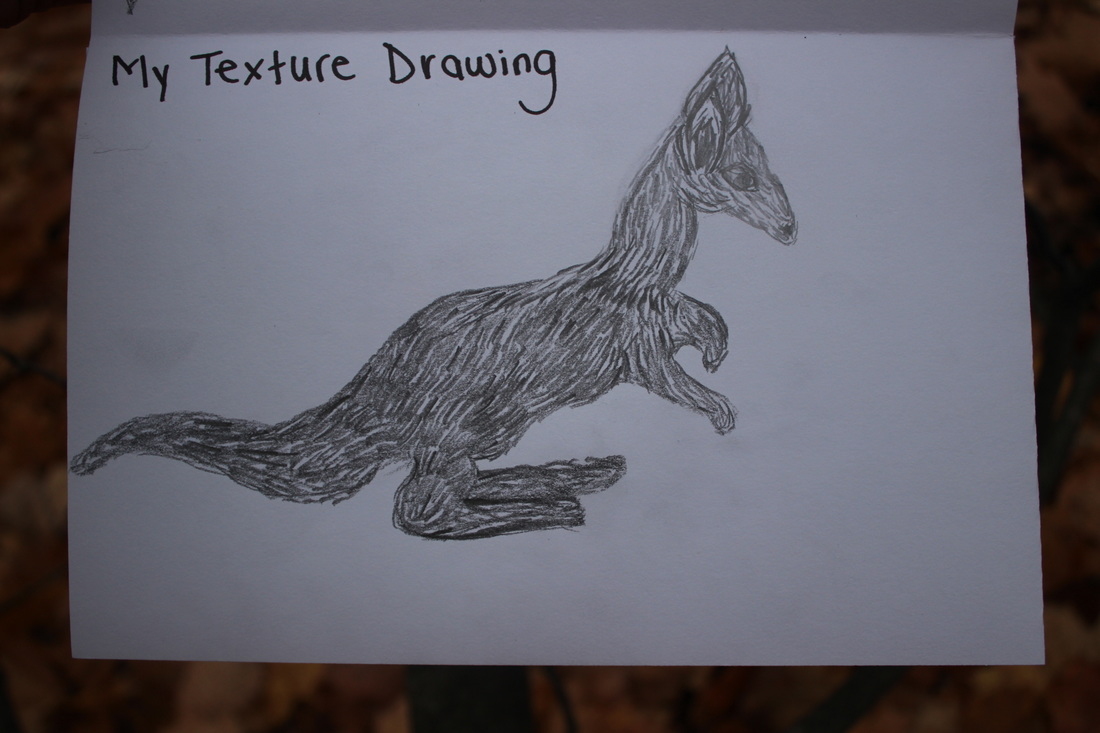
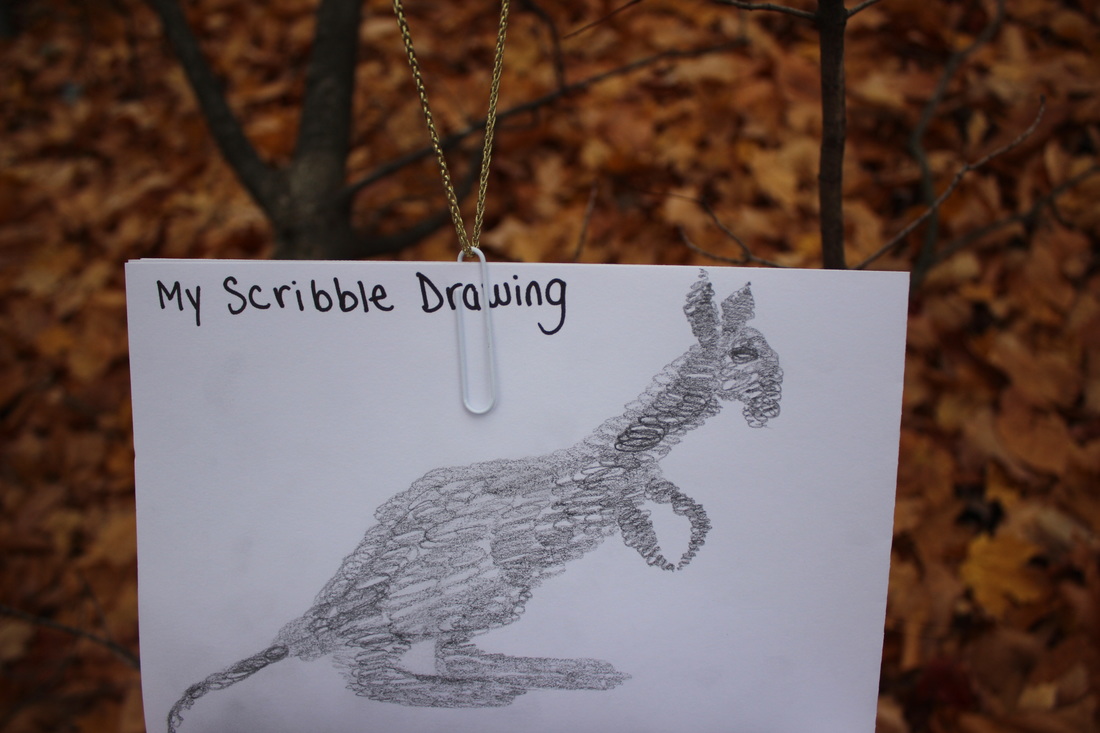
Drawing: Completed Sketches of One Animal Model
For this particular task we had to sketch an animal figure multiple different ways. For the first task we had 7 minutes to complete a sketch of the figure without using an eraser. Having read the "ish" by Peter Reynolds inspired me to accept myself and my capabilities and being the best artist that I can be.
7 Minutes: Having only 7 minutes was stressful for me because I could not process how I wanted to draw the Kangaroo and what from what angle. Because I could not use an eraser I was tensed about every move I made. I was unsuccessful in completing my figure. 7 minutes was too short for me.
Strengths: What I like most about my first sketch was the left ear of my kangaroo because the shape is smooth and tear drop like. I also like the eye, it has a determined look that resembles the figure.
Weaknesses: What I least like about my image is that the tail is not accurate the figure and I did not have time to finish the arms. The foot is not sized accurately in comparison to the body and the other foot is missing.
Next Steps: My next steps would be to complete the figure entirely and measure the animal figure to develop correct proportions.


|
|

|

|

Session 6&8: Print Making Possibilities

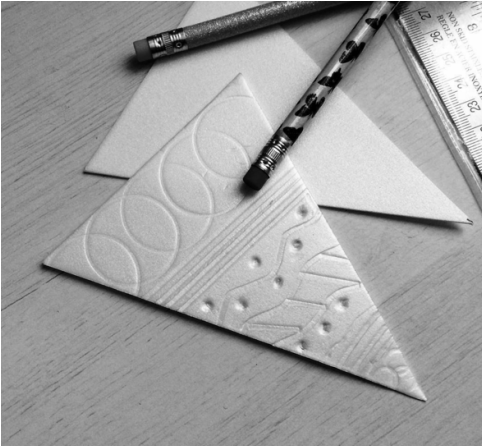
Print Making: Foam Stamps
Strengths: The colours blend and contrast nicely against one another and I love the backwards effect on the multi-patterned pieces. I originally created one foam piece but in the last second created a second foam piece, the pattern worked out well. The two patterns make the piece unique and stand out rather than being the same design all over.
Weaknesses: I was running out of time and did not apply more paint to my foam stamps. Therefore, some of the triangles are more bold than others. I could view it as a happy mistake and call it a fading effect but I originally planned for the entirety of the collage to be bold.
Next Steps: I want to create bold images with a variety of different foam piece sizes and shapes as well as experiment with different tools to create the imprint.

|
|

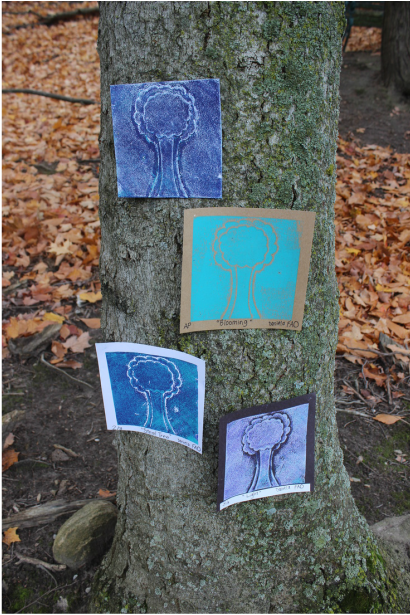
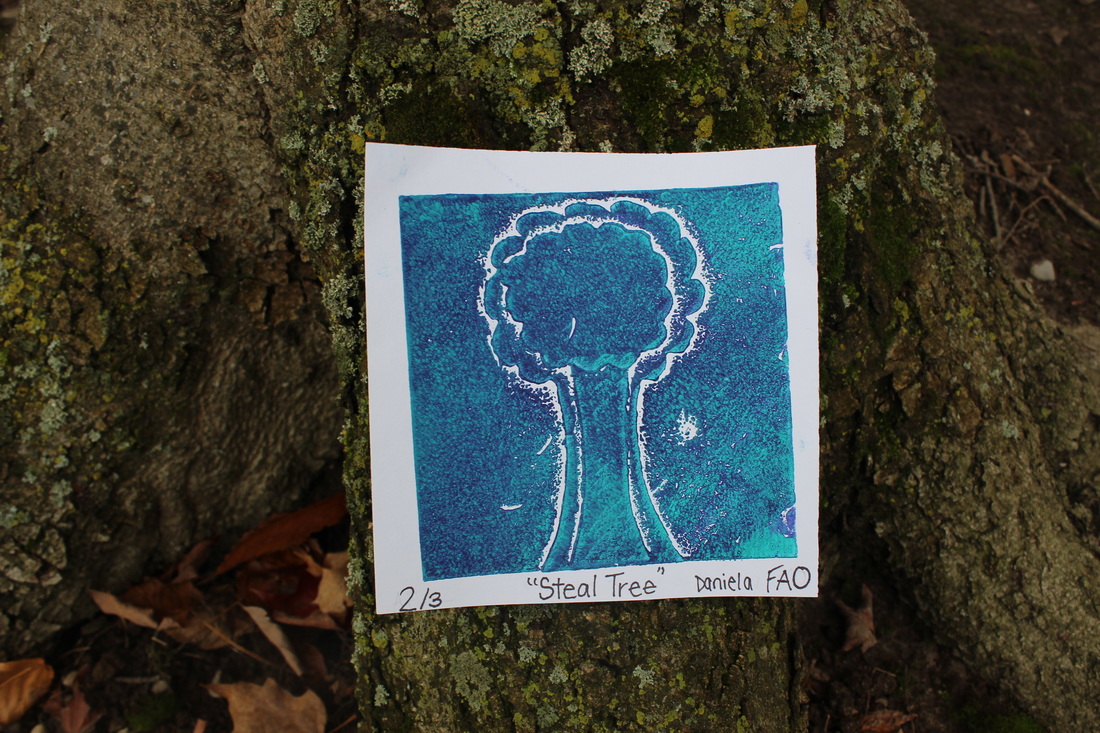
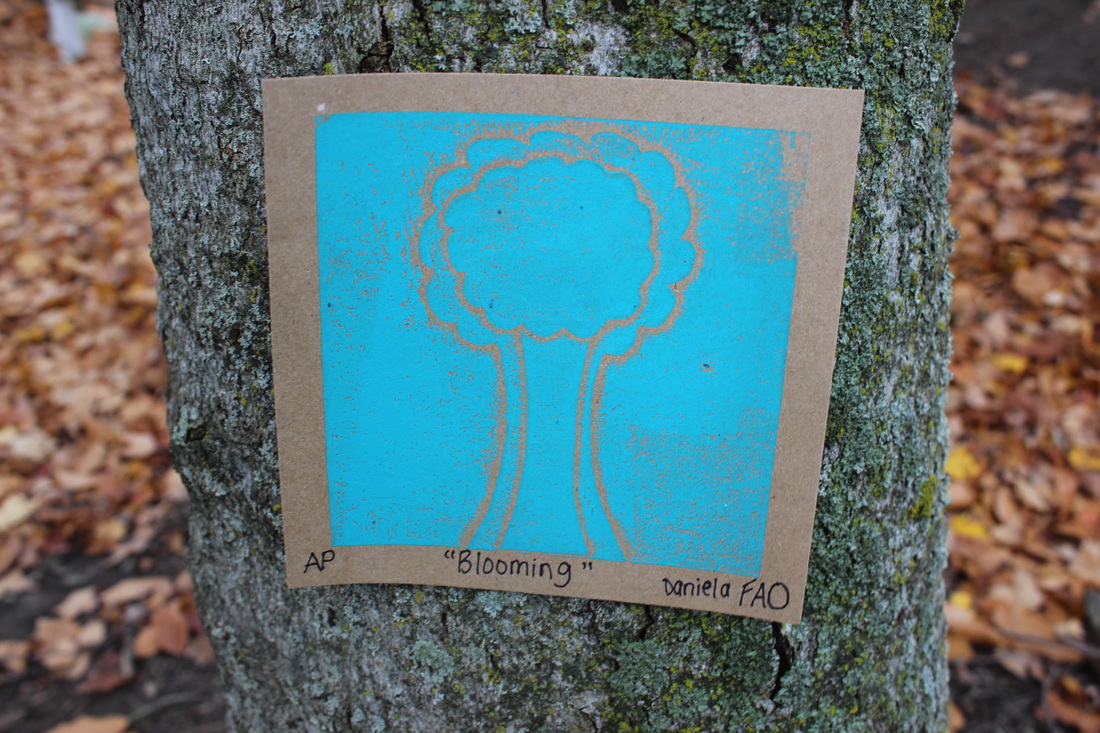
Print Making: Layered Effect
Strengths: I love the colours and background shades chosen for my prints. I love the layered effect and the halo around the leaves of the tree. My favourite print is the third one because all of the colours I used pop off the black construction paper and stand of vibrantly.
Weakness: Along the edges of some of my prints is faded. Particularly in my second print the white blotches appeared. This weakness had occurred from being rushed and not pushing down on the print hard and long enough.
Next Steps: My next steps is to create a more complex design. Since this was my first time print making I decided to use a simple design that I thought would come out nicely and it most certainly did. I believe now with the experience i have gained I can make larger and more detailed creations.
Session 7: Into the Third Dimension with Masks SCULPTURE

|
|
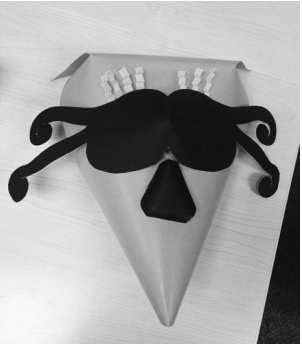
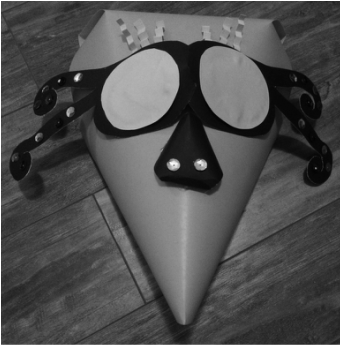
Creation: Paper Sculpture
Slot and Tab: Hair
Fringing: Earrings
Scoring: Nose
Symmetrical piece: Face mask underneath the eyes
Repeating line/shape design: Eyes
3D: Feathers
How is my mask like me?
My mask is similar to me because it has big bright eyes and rosy cheeks. The big eyes and rosy cheeks resembles my physical and caring characteristics. I want to watch over each and every one of my students. My mask has a funky appeal and I am a quirky kind of gal. The hair is is crazy because I often let me hair down a lot which represents my flexibility and mellow characteristic. The mask seams busy but everything has its place. I can feel unorganized and chaotic but everything eventually falls in place and goes better then expected. The feathers are pops of colour because I often bring as much colour as I can into my life. When I wear my mask I feel like my persona is a more enthusiastic version of myself because of all the bold, bright colours and the sequences.
How is my mask not like me?
The colours clash in my opinion and I often like to mix complementary colours together. The mask is not like me because the mask looks confident. Behind the mask I am nervous because I never know what to expect and am always unsure of myself. The mask is a more upbeat version of myself and has more character. The mask is different than myself also because of its pirky lips. I tend to smile a lot and have my mouth open because I am chatty.
How does my mask...
Sit: in an upright, tall position holding a hot beverage.
Stand: with legs crossed and hands in back pockets.
Move: jumping and swaying.
Lesson Plan
|
|

|
Lesson Planning: Description
The children will be inspired when watching a short video about Andy Goldsworthy and his natural creations. The teacher will prompt questions thinking about how he uses lines, composite shapes and textures in his creations. The students are taken outside to explore and experiment with textures and lines in organic objects found all around them. Their challenge is to design a bird using mix media on a flat base. They will look high and low and collect a minimum of ten items to create their bird. Their creations will include mixed media objects such as twigs, leafs, rocks and feathers that will be combined. When the students arrive back in the classroom, the teacher will read a story called “Leaf Man” by Lois Ehlert, they will learn about symmetrical shapes and repetition design. Students are then provided time to plan and focus on their design. The students will produce three varieties of lines to create space and shape, at least two types of textures and a minimum of three colours. The teacher will ask questions, provide examples, and be supportive with feedback and opportunities to share throughout the creative process. During consolidation the teacher will give each student a post it, the students will share their creation with a partner and write two stars and one wish. Just before the end of class the students are encouraged to make at least one revision to their creation and reflect about their creative process at their table. The students will use an IPad to photo document their bird and upload their images to a shared class Google document. Throughout this lesson the students will develop a deeper understanding in using a variety of lines, composite shapes, contrast, warm and cool colours. They will become more knowledgeable about symmetric shape and combining natural objects. The students will also strengthen their digital skills of web sharing and being inspired by their peer’s work of art.
The children will be inspired when watching a short video about Andy Goldsworthy and his natural creations. The teacher will prompt questions thinking about how he uses lines, composite shapes and textures in his creations. The students are taken outside to explore and experiment with textures and lines in organic objects found all around them. Their challenge is to design a bird using mix media on a flat base. They will look high and low and collect a minimum of ten items to create their bird. Their creations will include mixed media objects such as twigs, leafs, rocks and feathers that will be combined. When the students arrive back in the classroom, the teacher will read a story called “Leaf Man” by Lois Ehlert, they will learn about symmetrical shapes and repetition design. Students are then provided time to plan and focus on their design. The students will produce three varieties of lines to create space and shape, at least two types of textures and a minimum of three colours. The teacher will ask questions, provide examples, and be supportive with feedback and opportunities to share throughout the creative process. During consolidation the teacher will give each student a post it, the students will share their creation with a partner and write two stars and one wish. Just before the end of class the students are encouraged to make at least one revision to their creation and reflect about their creative process at their table. The students will use an IPad to photo document their bird and upload their images to a shared class Google document. Throughout this lesson the students will develop a deeper understanding in using a variety of lines, composite shapes, contrast, warm and cool colours. They will become more knowledgeable about symmetric shape and combining natural objects. The students will also strengthen their digital skills of web sharing and being inspired by their peer’s work of art.
Exit Ticket
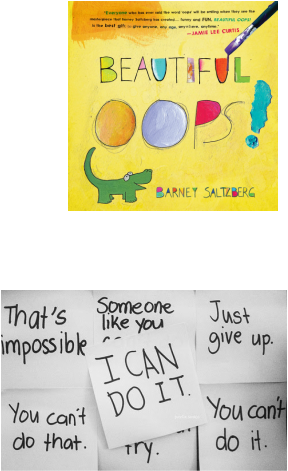
Learning alongside my students is more beneficial than being an expert because the students are not intimidated or afraid of high expectations. If the students see me struggling or have a flaws in my art they will realize it's okay to make mistakes and to learn from them as well. I could teach the students how to turn "oops" into happy mistakes. Many of my teachers would say "don't laugh i'm not a good drawer" but I always remember being impressed by what the drew. I think as teachers we need to give ourselves some credit. The students don't care about perfection, I believe they are instantly amused that you are participating or modelling the art and that's simply good enough for them. Learning alongside my students also means creating a healthy relationship and bond with the class. If the students see that I am growing as an individual, it will encourage and motivate them to grow as well. If a teacher sets themselves up as an expert the learning experience becomes focused on the final product rather than the process. I believe it is important to model growth because that's what we want to see in our students.
Having a growth mindset in the Art room means taking on new challenges with a positive attitude. A growth mindset also requires taking feedback and revising work. It is an important aspect to never stop creating because ideas get stronger when there is critical feedback and suggestions. Growing is apart of learning and discovering. Students need to develop a safe environment with their teacher where they can explore and create without limitations. growth mindset involves having an optimistic outlook towards the class. If a student believes that he/she can't complete a task then she will not be able to do so. I believe if you demonstrate an "I can" attitude the students will follow. I am guilty for saying "I can't" especially when it comes to art but what is so amazing about art is that anything is possible as long as you do the best you can, the outcome may not be what is planned but the overall experience is just as much gratifying.
It is soon for me to be in front of little ones teaching them art... Do I think I am ready? ... Absolutely not. I do not think I will ever be prepared enough because art can get crazy and messy and the time flies by so fast i wouldn't know where to start. Fortunately art is suppose to be chaotic and fun! A lot of strategies I have learned from this course can be applied in my many years of teaching to come. Developing a grocery cart is a great tool to set the students up for for success by telling them what is expected to be in their cart. I enjoyed having alternative music played when entering into the classroom it created a positive and joyful atmosphere. I have learned how to model for the students so that they are all able to see while taking in consideration for the students who need to stand behind or beside me for visual purposes. To be honest, I am really excited to try all the art work we have created with my future students. I intend on first creating an "Ish" book with the students. This book allows the students to explore a variety of drawing techniques and become comfortable at drawing at their own capability. The "Ish" book allows students to feel okay if there drawing is not perfect or an exact replica of the model. It also helps students to be proud of their work because they put their best efforts in and thats all that matters. I think I am most excited to create masks with my students. What Is most fun about the masks is the freedom to create and design whatever comes to mind. I believe the mask is an awesome activity to create different persona's and to express individuality and differences. I cannot wait to see what my future students produce and how I am able to support and encourage each and every one.
Little Miss Artist
